The FusePoint Walktour web part allows administrators to create interactive guided tours directly within SharePoint pages.
Each tour consists of a sequence of steps that highlight specific areas of the page, providing tooltips and instructions to guide users through key features or workflows.
Features
Step-by-Step Guidance – Create structured walkthroughs for users visiting a page.
Setup in Edit Mode – Click “Set up Walk-tour” to enter configuration mode directly from the page.
Fluent UI Modals – Each step displays a clean modal with a title, description, and navigation buttons.
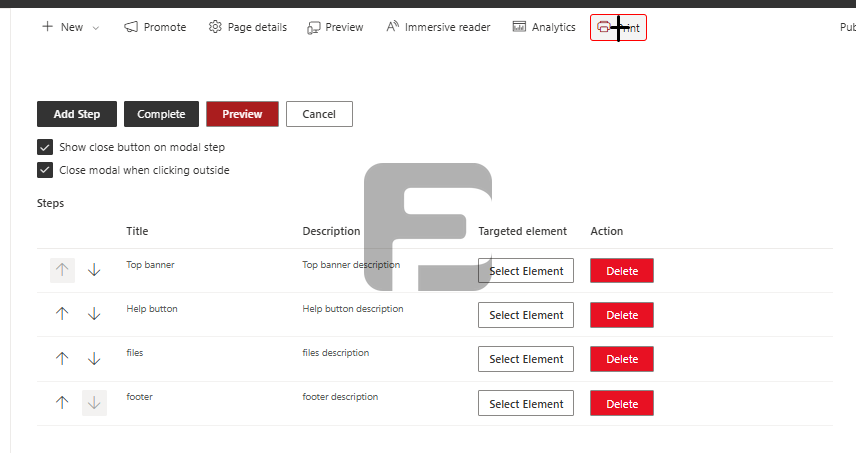
Step Management – Add, remove, or reorder steps easily through the setup interface.
Targeted Elements – Choose where each tooltip appears by selecting elements on the page.
Elements can be identified using XPath or percentage-based screen positions for flexibility.
Save in Property Pane – All steps are stored within the web part’s property data for portability.
Smart Rendering – Automatically waits for SharePoint content to load before displaying the tour.
Fallback Logic – If an element isn’t found, the tour displays at the web part level.
Enhanced UX Options:
Show or hide Close button (default: true)
Close modal when clicking outside (default: true)
Optional description field per step
Automatic “Previous | Finish” switch on the last modal
Error Handling & Auto Scroll – Displays a spinner and scrolls the page to ensure all web parts are rendered before starting.
How to Use
Adding the Web Part
Edit your SharePoint page.
Add the FusePoint Walktour web part into the desired section.
Publish or keep the page in edit mode to begin setup.
Setting Up the Walktour
In Edit Mode, click “Set up Walk-tour” within the web part.
The configuration panel appears directly on the page (not in the property pane).
Use the available controls to:
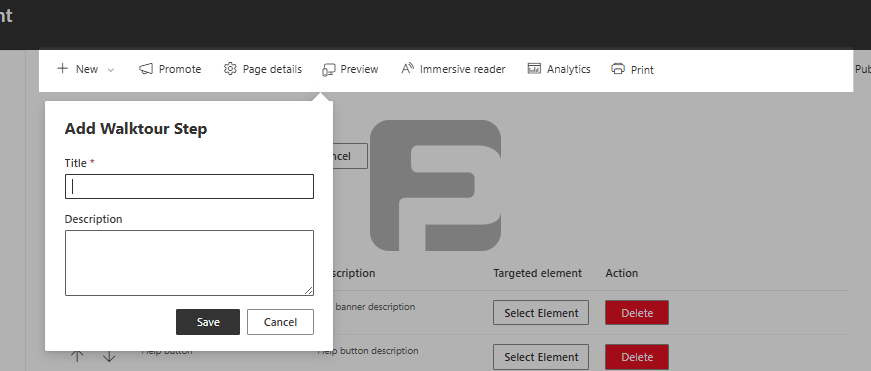
Add Step – Create a new step in your tour.
Enter Title – Required. Appears as the modal header.
Enter Description – Optional. Explains the purpose or action.
Select Element – Click “Select Element” and choose the on-screen element to target.
The target is stored using XPath, ensuring placement accuracy.
Reorder Steps – Drag or use controls to change step order.
Delete Step – Remove unnecessary steps.
Preview – Test how your walkthrough will appear.
Complete – Save your tour configuration.
⚠️ You cannot complete setup without adding at least one step.
In View Mode
Page admins will see a “Set up Walk-tour” button on the command bar for quick access to edit the tour.
When the tour is active, users can navigate with Next, Previous, and Finish buttons.
The modal automatically scrolls to each target element as steps progress.
If a targeted element isn’t found, it defaults to the top of the web part.
The tour will show a loading spinner until all elements on the page are fully rendered.
User Experience
The tour begins with a modal introducing the page or feature.
Users progress step by step using navigation buttons.
Smooth transitions and auto-scroll ensure the highlighted element is visible.
A progress indicator and “Finish” step guide the user through to completion.
When an element is missing, the tour gracefully skips or adjusts its focus.
Benefits
User Onboarding – Perfect for guiding new employees through complex SharePoint pages.
Training & Documentation – Provide in-context learning without leaving the page.
Admin Friendly – Create and modify tours directly from the page surface—no code required.
Resilient – Auto-scroll and fallback handling reduce setup errors.
Consistent Design – Built with Fluent UI to align with Microsoft 365 styling.
Conclusion
The FusePoint Walktour web part provides an intuitive, modern way to create guided walkthroughs within SharePoint.
From onboarding new users to demonstrating site features, it’s a powerful tool for delivering interactive, in-page guidance.
With XPath targeting, fallback handling, and real-time editing, admins can quickly build and maintain rich learning experiences.
Try FusePoint for Free!
No credit card required.
FusePoint
The perfect addition to your SharePoint environments.